板付けされたビカクシダって高いですよね…。
鉢植えだと数千円なのに、板付にされた途端1万円超えてくるので、自分で板付をしようと考えている人も多いんじゃないでしょうか?
確かに、大体の鉢植えビカクシダは普通に板付けできます。
![](https://midori-no-green.com/wp-content/uploads/2022/12/tori_sad-150x150.png)
でも鉢植えのスパーバムやグランデはL字に曲がっていることが多いので、板付けが難しいんです…
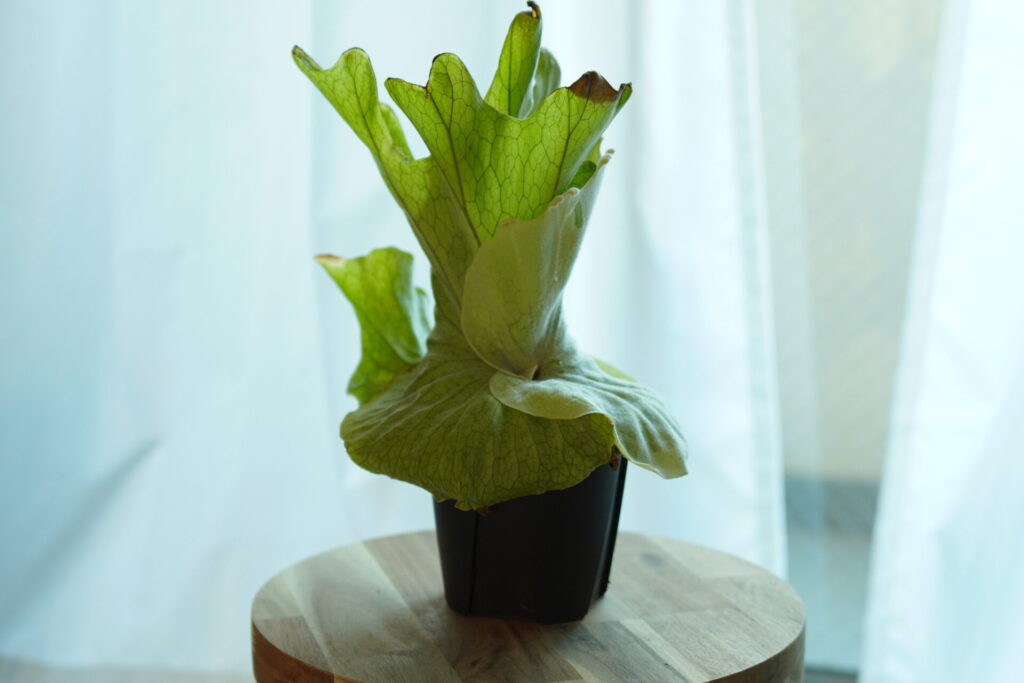
下の画像を見ていただければ「これ板付けにしたら角度おかしくなるよね」っていうのが一発でわかっていただけるかと思います。
![](https://midori-no-green.com/wp-content/uploads/2023/07/b603e87c0acacd87f045f9f581dc5e1c-1024x683.jpg)
こういう感じのスパーバムをうまいこと矯正して板付けできたので、今回は体験記的な感じで書いていこうと思います。
ビカクシダの板付けに必要なアイテムや板付けの手順も解説していくので、板付けにお悩みの方は参考にしていただけると嬉しいです!
![](https://midori-no-green.com/wp-content/uploads/2022/12/tori_understanding-150x150.png)
このサイト(みどりのグリーン)は100株以上の植物と暮らすデザイナーが運営しております。
記事内の写真も我が家で撮影したものなので、あわせてお楽しみください!
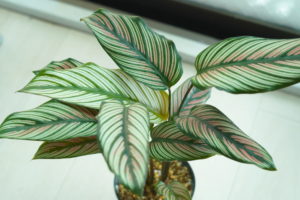
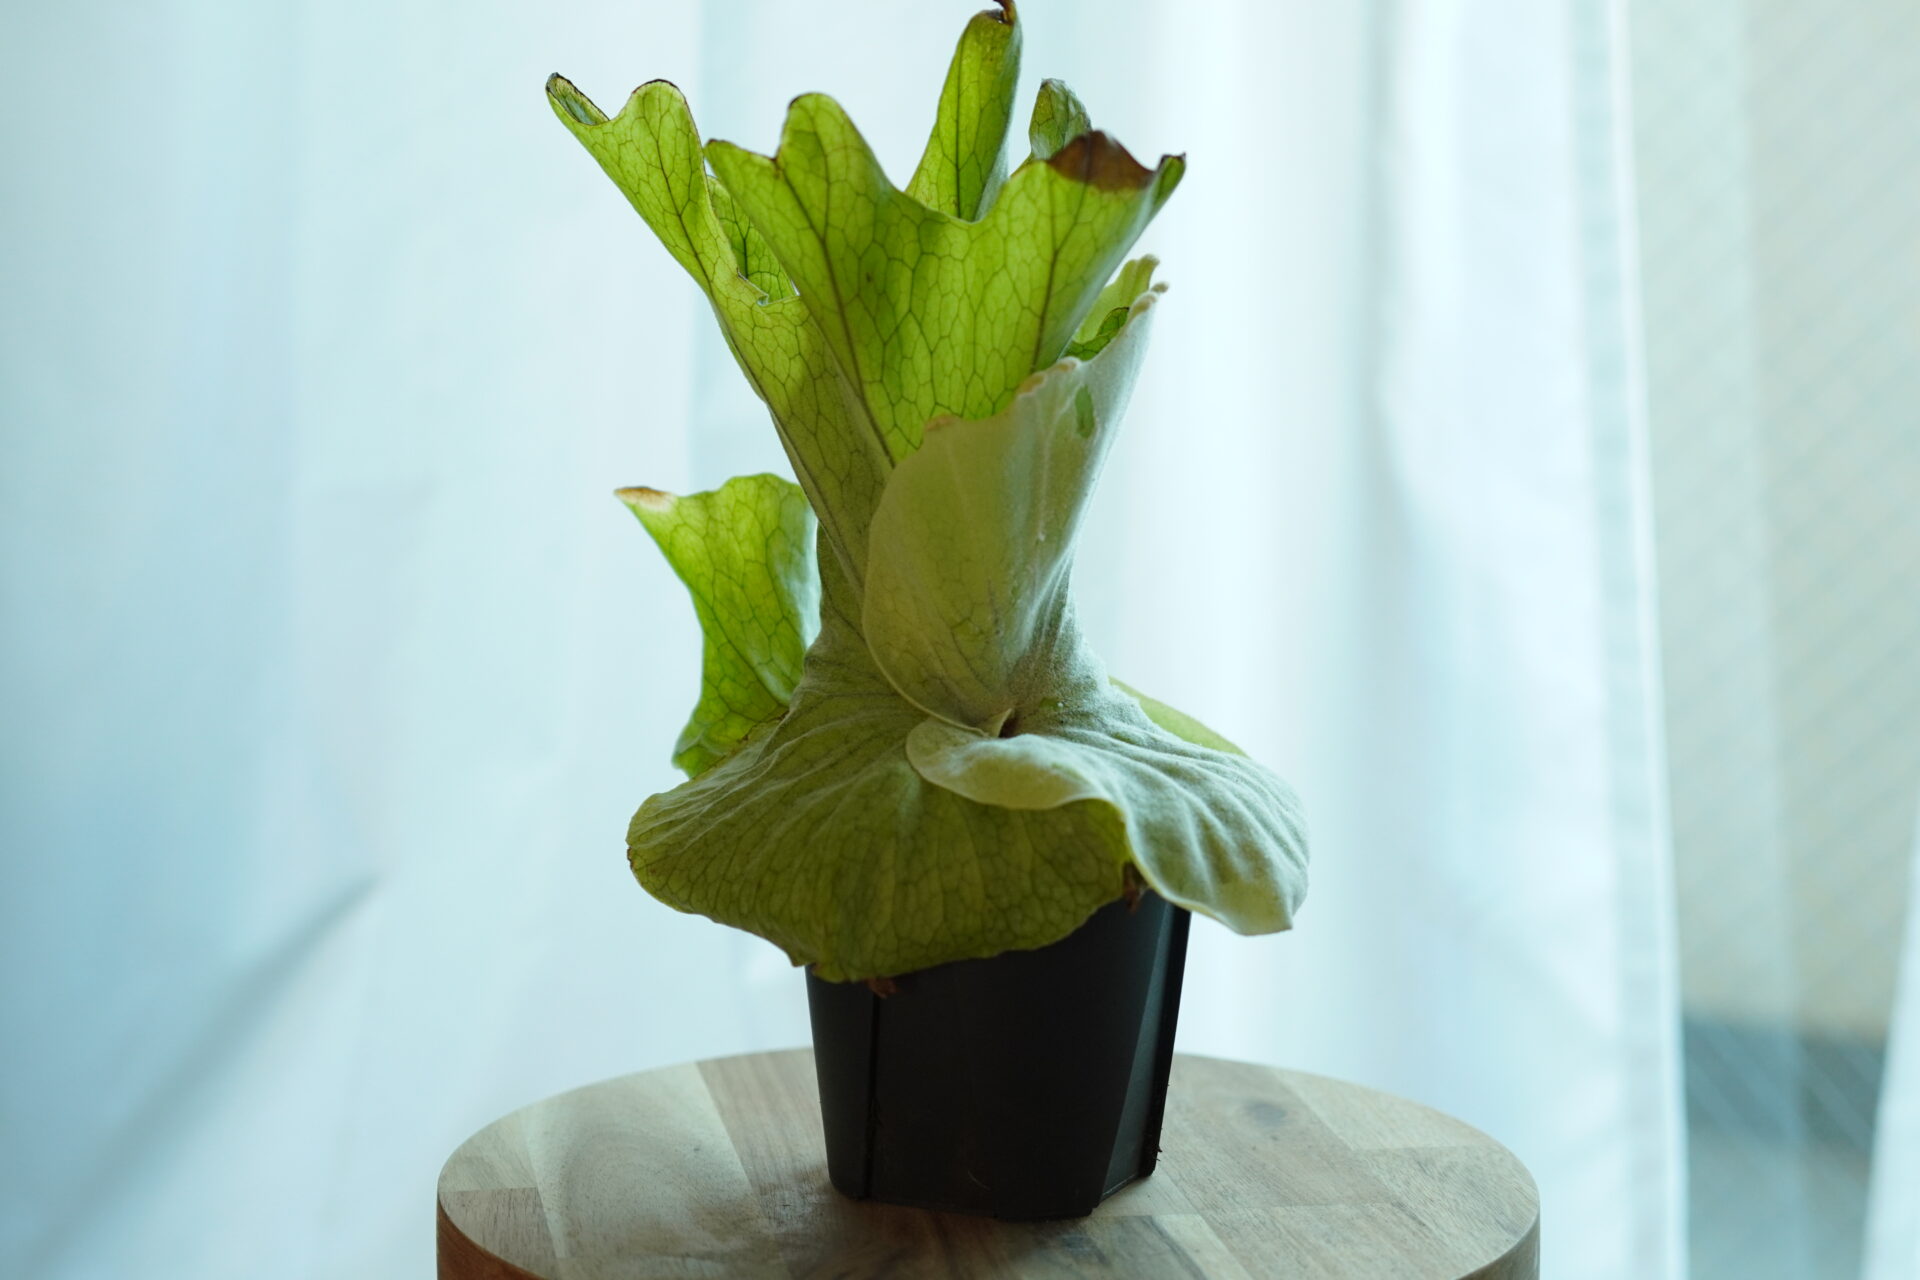
今回板付けするビカクシダ・スパーバム
![](https://midori-no-green.com/wp-content/uploads/2023/07/DSC01898-1024x683.jpg)
今回は上の画像のビカクシダ・スパーバムを用意しました。
購入したのは2023年3月下旬です。
写真からもわかるようにL字に曲がっているので、板付けすると王冠部分が横向きになってしまいます。
![](https://midori-no-green.com/wp-content/uploads/2022/12/tori_normal-150x150.png)
とりあえず板付けしてみて、様子を伺います…!
板付けに必要なアイテム
![](https://midori-no-green.com/wp-content/uploads/2023/03/DSC01896-1024x683.jpg)
- 板
- 水苔
- テグス
- ワイヤー(吊るす用)
![](https://midori-no-green.com/wp-content/uploads/2022/12/tori_normal-150x150.png)
今回はこちらのアイテムを用意しました
板
![](https://midori-no-green.com/wp-content/uploads/2023/07/DSC01802-1024x683.jpg)
東急ハンズで買ってきた板です。
ビカクシダの板付けには焼いた杉板やヘゴ板などが定番ですが、テグスを巻いて歪まない程度に丈夫ならなんでもOKです。
吊るす場合は紐などが通る穴が空いているものを選びましょう。(それか自分で空けましょう)
水苔
![](https://midori-no-green.com/wp-content/uploads/2023/03/DSC01786-1024x683.jpg)
ビカクシダの根っこが着生するための水苔です。
今回はSpagmoss(ニュージランド産)の水苔を用意しました。
Spagmossの水苔は、節部分のゴミが少ないですし、長くて切れにくいのでおすすめです。
テグス
![](https://midori-no-green.com/wp-content/uploads/2023/03/DSC01845-1024x683.jpg)
テグスはビカクシダを固定するのに使います。
今回用意したのはエキスパートの10号のテグス。
伸び縮みするテグスは巻きにくいんですが、こちらは伸びないタイプなので使いやすいです。
ワイヤー
![](https://midori-no-green.com/wp-content/uploads/2023/03/DSC01833-1024x683.jpg)
板を吊るすためのワイヤーです。
あまりにも細いと支えきれない場合があるので、今回は3mmのアルミ針金を用意しました。
ビカクシダ・スパーバム(グランデ)の板付けの流れ
![](https://midori-no-green.com/wp-content/uploads/2023/03/DSC01793-1024x683.jpg)
水苔と水を一緒の容器に入れて戻します。
少量の水といっしょに容器に入れておいて、12時間くらいかけて戻すと、かなりふんわりするのでおすすめです。
上の画像くらいの水苔だと、大さじ1杯くらいでふんわり戻ります。
![](https://midori-no-green.com/wp-content/uploads/2022/12/tori_normal-150x150.png)
水を入れてシャカシャカ振りましょう
![](https://midori-no-green.com/wp-content/uploads/2023/07/DSC02234-1024x683.jpg)
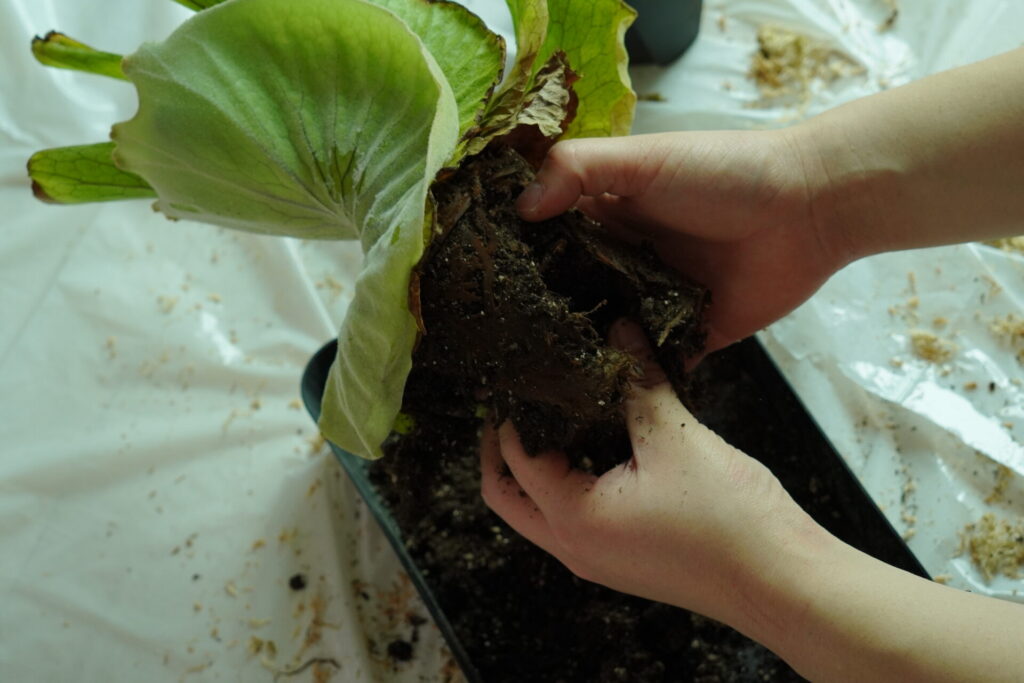
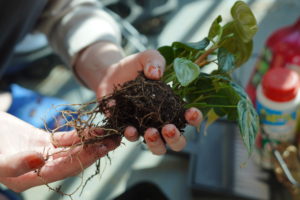
鉢から引っこ抜いたままだと板付けできないので、根っこをほぐしていきます。
多少根っこをちぎってしまっても大丈夫なので、根っこについた土や水苔をきれいに取り除きましょう。
![](https://midori-no-green.com/wp-content/uploads/2022/12/tori_happy-150x150.png)
ざっくり手で取り除いたあと、水にさらすときれいにとれますよ!
![](https://midori-no-green.com/wp-content/uploads/2023/07/DSC02279-1024x683.jpg)
水苔を板に盛ります。
真ん中は根っこが入るので、チキンラーメンの要領でくぼませましょう。
![](https://midori-no-green.com/wp-content/uploads/2023/07/DSC02293-1024x683.jpg)
根っこを窪みに入れて、水苔で包んでいきます。
![](https://midori-no-green.com/wp-content/uploads/2022/12/tori_normal-150x150.png)
やっぱりどう頑張っても王冠が横向きになりますが、そのまま進めます。
![](https://midori-no-green.com/wp-content/uploads/2023/07/DSC02314-1024x683.jpg)
テグスを巻いてビカクシダを固定していきます。
成長点は巻き込まないようにしますが、貯水用は巻き込んでしまってOKです。
できるだけ少ない回数(15~20回くらい)で巻くのがいいらしいですが、初心者なら何回でも巻きましょう。
![](https://midori-no-green.com/wp-content/uploads/2022/12/tori_normal-150x150.png)
私も下手くそなので何回も巻きます。
様子をみながら、必要であればら水苔を追加します。
![](https://midori-no-green.com/wp-content/uploads/2023/07/DSC02333-1024x683.jpg)
![](https://midori-no-green.com/wp-content/uploads/2022/12/tori_happy-150x150.png)
とりあえず板付け完了しました!
貯水葉をぶった切ってみた
![](https://midori-no-green.com/wp-content/uploads/2023/07/DSC02340-1024x683.jpg)
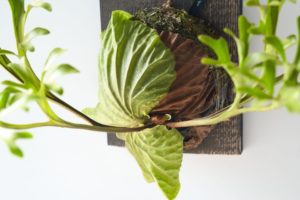
とりあえず壁に吊るしてみたんですが、やっぱり上の画像のように王冠が横向きになってしまいました。
柔らかそうに見えますが、貯水葉はめちゃくちゃ硬いので矯正しようとすると折れてしまいます…。
ということで上部分をぶった切ってみました!
![](https://midori-no-green.com/wp-content/uploads/2022/12/tori_understanding-150x150.png)
えーい!!
![](https://midori-no-green.com/wp-content/uploads/2023/07/DSC02341-1024x683.jpg)
こうすれば上部分のつっかえが無くなるので、次に生えてくる貯水葉はまっすぐ登って行ってくれるはず。
![](https://midori-no-green.com/wp-content/uploads/2022/12/tori_normal-150x150.png)
結構ダメージが大きそうだけど、ビカクシダは強いから多分いける…!
その後どうなった?
貯水葉をぶった切ったのが2023年3月21日で、この記事を書いているのが2023年7月8日。
![](https://midori-no-green.com/wp-content/uploads/2022/12/tori_happy-150x150.png)
結論から言うと、貯水葉が無事出始めました!
2ヶ月位全く動きが無かったんですが、6月初頭から貯水葉が出始めました。
![](https://midori-no-green.com/wp-content/uploads/2023/07/DSC00679-1024x683.jpg)
![](https://midori-no-green.com/wp-content/uploads/2023/07/DSC01806-1024x683.jpg)
![](https://midori-no-green.com/wp-content/uploads/2023/07/DSC01987-1024x683.jpg)
![](https://midori-no-green.com/wp-content/uploads/2023/07/DSC02578-1024x683.jpg)
![](https://midori-no-green.com/wp-content/uploads/2023/07/DSC02853-1024x683.jpg)
![](https://midori-no-green.com/wp-content/uploads/2023/10/DSC06799-1024x683.jpg)
![](https://midori-no-green.com/wp-content/uploads/2023/07/DSC08282-1-1024x680.jpg)
![](https://midori-no-green.com/wp-content/uploads/2022/12/tori_doya-150x150.png)
今後も大きな動きがあれば追記していきますね!
楽しいグリーンライフをお送りください!
ビカクシダは強いので、貯水葉を切ったり折ったりしても大丈夫な場合が多いですが、やる場合はくれぐれも自己責任でお願いします!
生育は気温も結構重要なので、やるなら春先あたりの生育期になってきた段階がおすすめです。
![](https://midori-no-green.com/wp-content/uploads/2022/12/tori_normal-150x150.png)
このサイト「みどりのグリーン」のインスタグラム版もあるので、ぜひあわせてチェックしてみてください!